Using Smart Previews in 3 Easy Steps
You've just gotten home from a wedding, or a shoot. You import the images to your desktop. You cull them, pull them into Lightroom and think to yourself, “Oh, what I wouldn't give to sit curled up on my comfy couch and edit these on my laptop.” Or perhaps you want to edit them while watching The Voice Finale with the rest of the family. Or maybe, you have a road trip coming up and you want to spend the time catching up on editing. Well now you can easily edit a wedding while on the road, or while on your couch and sync the images to your main computer at a later time. All of the changes you made to the smart previews, will be reflected in the original image after syncing! It's awesome, and easy.
With LR5 you can now, easily and quickly, transfer ‘smart previews' to any other computer, while keeping the main catalog of those images on your desktop. Smart Previews are lossy DNG files which are a maximum size of 2540 pixels on their longest edge. They are created from the original raw files and they are stored in a folder in the same location as the Lightroom catalog. Because they are a preview, the are much, much smaller, and it takes no time at all to export an entire wedding catalog to work on it, on a different computer. And the best part, when working with smart previews, it is not necessary to have the original files on the computer you are editing from!
So are you ready to try it. It's so simple and can be done in 3 easy steps!
Step one: Exporting a Catalog of the Images
Go to the Library Section of LR5 and navigate to the catalog you want to export smart previews of.
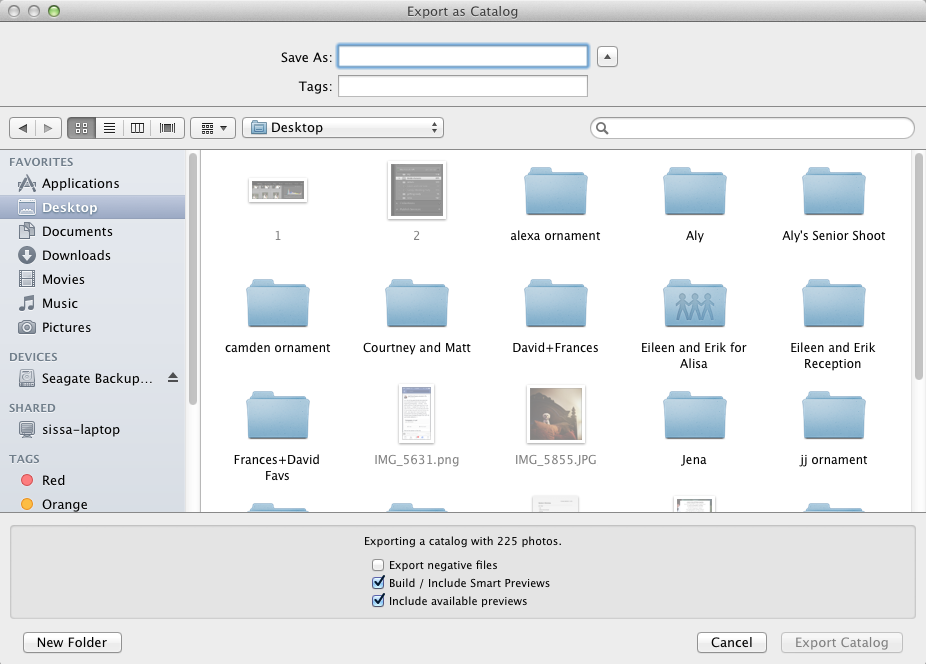
Highlight all of the images, and go to File > Export as Catalog. A window will pop up that looks like this. Where it says ‘Save As' give it the same name that it is in LR5. If it is called John and Mary Wedding in your Lightroom interface, then call it John and Mary Wedding. Then put check marks in 2 of the 3 boxes at the bottom of the screen. Check 'Build/Include Smart Previews' and ‘Include available previews.' Uncheck ‘Export negative files' as that's exactly what we're trying to avoid doing! You only need the smart previews to work on the images on another computer. Then push Export Catalog.
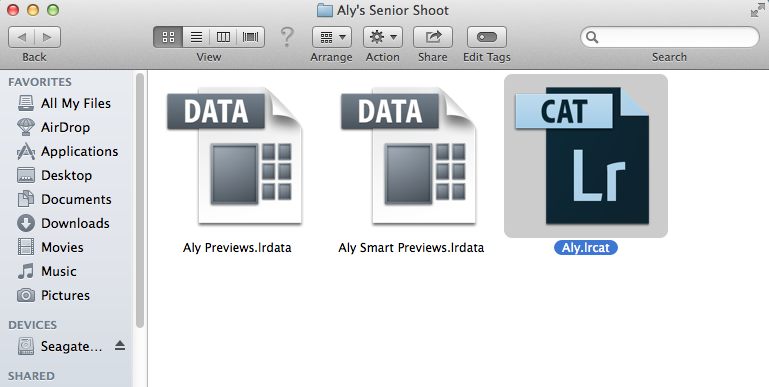
Export the Catalog wherever you like. For example, onto your desktop, or an external drive, or even into your Dropbox folder. You will know if it's exported correctly if you have a folder with 3 files in it. It should look like this. You will need all 3 of these files in order to edit smart previews on another computer.
Step two: Copy the Folder/Catalog to Your Other Computer and Open in LR5
Before importing this temporary catalog into LR5 on a different computer, you have to copy the catalog over to that computer's hard drive. If you're using an external drive or Dropbox to move the temporary catalog, don't just plug it in and attempt to edit the catalog from the external drive. Make certain the temporary catalog is copied to your laptop. You can even just drag it to the desktop.
Now go to LR5. When opening your temporary catalog in LR5 you have several of options. I will share the way I have found to be the easiest.
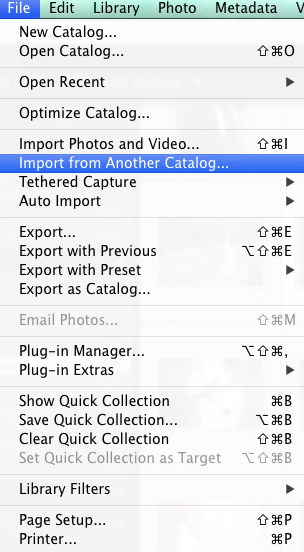
Open Lightroom and go to File > Import From Another Catalog, and navigate to the temporary catalog that contains the smart previews.
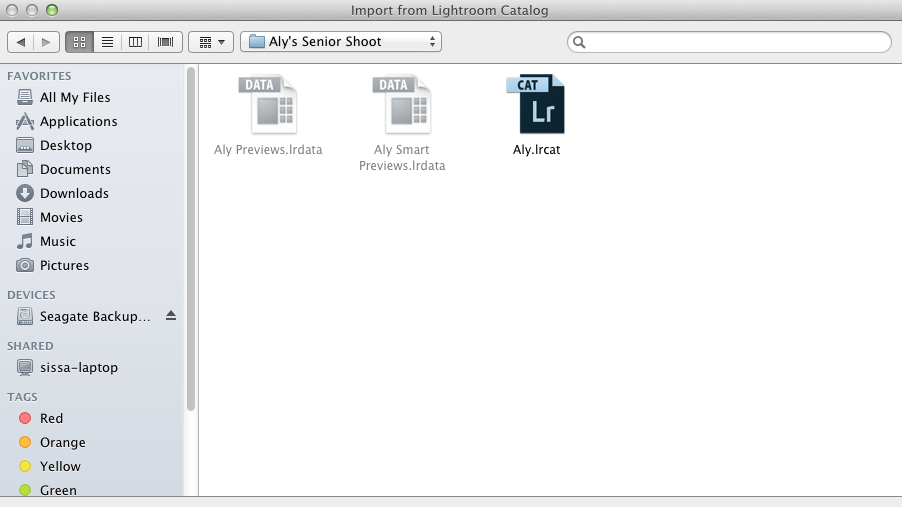
The only file you will be able to click is the ‘Ircat' file. Click it and push ‘choose.'
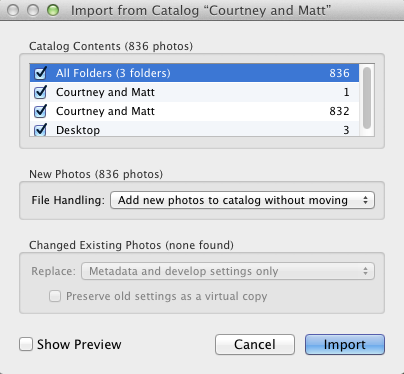
Another window pops up that looks something like this. Now click ‘Import.' And that's it. Lightroom will import that temporary catalog and you can edit those files, in the develop module, just as you would the original, full res, RAW files.
Once the smart previews have imported into LR5, you will notice that at the top right, under the histogram, it shows ‘Smart Preview' in small text. (See image below for a description of the different icons you will see.) Again, the edits you make to the smart previews are saved as metadata in the temporary catalog, and will be written back into the original image when it is synced with the original image on your desktop computer, where the original catalog presides.
Step Three: Getting the Edits Back to the Original Lightroom Catalog
First you'll need to export them from your laptop just as you did in Step One above: select the images you worked on, then use the same File > Export as Catalog, and use the same settings as above in step one, and save it to a folder on your desktop. You need to save it into a folder if you do not want to replace the temporary catalog on your desktop. Now transfer this catalog back to your desktop using your preferred method.
I suggest putting it into a folder onto the desktop of the main computer, rather than replacing the one that might already be there. Once you have your incoming transfer catalog back on your main computer, open LR5 and select File > Import from Another Catalog, and navigate to the incoming catalog. In the next screen choose ‘Replace: metadata and develop settings only' and you may want to check ‘Preserve old settings as a virtual copy' if you'd like to hang on to the original look of any of the images you've edited.
And that's it! LR5 will import the Smart Previews and accompanying metadata, tie them to the originals it already has in its master catalog and make the appropriate changes to its own metadata records for those images. It's like magic as you watch the images change before your eyes as the metadata is embedded into the original images.
A couple of things to note: Do not move the original images until after you have synced them with the changes you made to the smart previews. Also, do not change the name of the catalog. Keeping the catalog's name the same throughout the process will save you a LOT of headaches! And that's it. That's all there is to it! It's easy as 1, 2, 3 to take your images anywhere you are, and edit them, knowing that all changes will be saved to the original file after syncing. Try it, you'll love it!
Start Your Free Trial
(Free for 14 days)
No credit card required


